Classic caramelized onions recipe
Caramelized onions should be any home cook's kitchen staple. If properly made, they can elevate even the most boring dishes to a culinary masterpiece status.
Equipment
- 1 large pan
- 1 wooden spoon
- 1 diffuser under the pan optional
- pot holders, oven mitts, trivets for hot dishes
Ingredients
- 6.5 lb yellow onions 3 kg.
- ½ cup neutral oil sunflower or grapeseed
- ½ tbsp. of salt
Instructions
Preparing the Onions
- Peel the onions and thoroughly wash them. Cut them in half and slice into thin slices.
Caramelizing the Onions
- Place the sliced onions in a large pan and coat them with oil. Stir to ensure the onions are evenly coated.
- Shortcut step: Cover the pan with a lid and bring the oil to a bubble over medium low heat.
- Shortcut step: Let the onions soften over the next 15 minutes. You should see a lot of onion juice as mixed with the condensed water inside the pan. Wait for the onions to become translucent, then reduce the heat to a low simmer and uncover the onions. From this point on, this is low and slow game.
- Steer occasionally, roughly every 30 minutes for the first hour.
- As onions start getting color you would want to steer them more often, about every 20 minutes or so. The onions will transform into a rich, raisin-like hue, and will look like a homogenous brown and jammy looking mixture, a sign that you've achieved the desired caramelization (3 hours without shortcut and 2.5 hours with shortcut).
- For optimal results, and if you do not have a simmer option on your stove, consider using a diffuser under the pan. The goal is to gradually caramelize the onions, allowing them to work their magic.
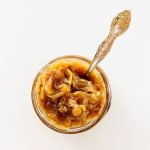
- Once ready you can store caramelized onions in sterilized jars and topped with a bit of boiling neutral oil, such as grapeseed or sunflower, to prevent oxidation. This will help them to keep fresh in the fridge for up to three weeks. If freezing, make sure to use freezer safe jars with tight fitting lids. While freezing is a viable option for caramelized onions, we are not fans of it as defrosted onions tend to be watery.
Notes
The specified in this recipe quantity of ingredients should yield enough caramelized onions preserve to fill three 8 oz. (250 ml) Mason jars.